Thursday, 7 February 2013

Thanks for popping by.

 
No Christmas today.
This is a quick thank you card using my favourite colour. The stamp is "medallion" from stampin up I think it may now be discontinued.
The thanks was given to me by one of my ladies and I think  it may have be a die.
The butterfly was the first intricate die I bought and is blue. I think it's a "marieanne" but I could be wrong.
Finished off with pearls


see you tomorrow

Wednesday, 6 February 2013

Big cards!!

 
I don't do big cards!! but this one is 8x8 so I guess thats big.
The image was a "Tulip" one from Docraft coloured with promarkers.
I then used a mask from "Stamp away" and embossed the design around the edge.
Finished off with a little ink.
This was stuck to a large piece of black card. The dots are "cosmic shimmer" and the technique used here is paved stone as used by Sue Wilson.
The bow was tied and had a small flower twisted around it before it was stuck down.


See you tomorrow

Tuesday, 5 February 2013

Merry christmas

This card was inspired by one that Tim Holtz did awhile back.
the tag was made using the resist technique.
The inks were "artiste" from Docrafts. The flowers were poinsettia from "spellbinders" and then tipped and embossed.
The reindeers were "spellbinders" I used hammered card for this one.


See you tomorrow.

Monday, 4 February 2013

Michel Powell

 
This cute image was a "Michel Powell" stamp coloured, glittered and die cut using "Xcut" postage nesting die.
The back panels were embossed with a snowflake folder and the bottom one was done using the "hougie board"
Finished off with lots of gems.


See you tomorrow

Snow much fun


This card was "snow much fun" to make.
I stamped 3 images coloured them all exactly the same. I cut a piece of white card 3x the length of one of the pictures. Rip at an angle and stamp the sentiments and images onto the card.
I matted as usual onto more card and stuck them to a DL scalloped card.
See you tomorrow

Sunday, 3 February 2013

Pleasant poppies


Pleasant poppies is a beautiful stamp set from stampin up and this card uses a small section of the stamp.
The purple card was embossed with a diamond folder (can't find the name sorry)
The cream panel was embossed with a dotty design.
A scalloped circle was placed behind the stamped circle.
The bow was made with a piece of tulli
 

See you tomorrow

Saturday, 2 February 2013

Ornamental branch

 
Another Christmas card.
The "branch" was. In a previous life a Docraft stamp with a poincettia. I cut this off!!!
Because it is a clear stamp I could see where I was stamping so I was able to join it in the middle.
Again the stamps are from Stampin up.
Another simple card that wasn't to bulky so would be better for posting.


See you tomorrow.

Friday, 1 February 2013

Christmas!!! Never too early.


This little number is a card I made for christmas. It did include several masks to achieve this "layered" look. It was coloured with promarkers. The stamps are from stampin up.


Iwould like to enter this in the C.R.A.F.T challenge


This is a simple little number! I love these florishes and leaves and thought I would try and keep this card as flat as possible. So I stamped a music score in black.
Arranged the florishes and leaves I stuck them with the minimum of glue so they were still floaty. The butterflies are stampin up ones and  are shaped and stuck with a small amount of glue. 


A close up of the florishes


See you tomorrow

Thursday, 31 January 2013

Baby Buddah

 
I decided it was time to get on and scrap my grandaughters she is 2 now!!!
Its hard to tell from this photo but the florishes are covered with gems as is the ends of the flags I used the spots and stripes collection from Papermania.
 
 
 Don't tell anybody but this is a future project for my ladies
 
See you tomorrow

Wednesday, 30 January 2013

Christmas!!!!!


So I know it's still along way off but thought I would show some of the Christmas cards we made in 2012.
A lot of our cards involve stamping this Christmas ones used stampin up stamps.
Ths is an A6 card. Cut a piece of red card 10cm x 14cm. Stamp a piece of 9.5cm x 13.5cm white card randomly with your stamps. Now cut a 2cm frame from the stamped card. Cut a 1.5cm frame from the piece you removed from the original frames.
Stamp you Sentiment.
Do the same with the piece of red. Now stick the stamped frames to the red and then stick them all together as shown.
Run a small amount of glue along the red edge and sprinkle with fine glitter 


This design can be done with any image stamped or printed.
Give it a go it is great fun.

Tuesday, 29 January 2013

Ist steps

 
I  tried taking these photos outside on Sunday as it was a dry day, so they are not the best.Sorry
This was a page we did at our monthly crop before Christmas.
 As you can see it uses very little paper so is a nice clean non fussy page. I love making flowers these were made with Xcut dies and using my favorite pine branch die. I also used a snowflake spray die. I think it is a marianne die but I'm not to sure.


See you tomorrow.

Monday, 28 January 2013

Oh heck


It's been such a long time but I'm back. I will try and be a better blogger.
So this little offering is from a batch of scrapbook layouts I have done. we are currently doing this one at my scrapbook crops.
The 12x12 card stock was a dotty coreordinations.
The papers are from home for christmas I used the X cut heart die and mats of black. the large heart was cut free hand and finished with a couple of gems.
The flower was made by cutting 8 small hearts folded in half and arranged in a circle. I topped the flower with a hand cut snowflake from a scrap of paper.
The leaves were cut from Cherry Lynn pine branch.
The title was cut on my cricut.
 
 
Our next scrapbook crop is on
 16th February
 so if you are interested in joining us send me an email at
Places need to be booked by 12th February as all kits are prepared in advance.
 

Saturday, 30 June 2012

Wellington

This little offering was made at my class on Monday. It started as a gate fold I then cut a scallop circle and then cut a circle from inside that. Stamped coloured and decoupaged the little girl from the stamp sheet. Stamped the sentiment in the circle. Cut some flowers and leaves and put in the corner. Stick the scallop circle to the right of the card and the circle to the left. Stick the girl to the scallop and decorate with gems.

Friday, 29 June 2012

Lighthouse keeper

This little Dutch fold card is decorated with the kanban lighthouse and micheal Powell beach huts.
I am showing off now as I have done this post from my phone.

Thursday, 28 June 2012

Phone

Sat at the doctors trying to get this diabetes sorted thought I would try and blog from my phone

Sunday, 24 June 2012

Sorry it's been a while but I hope to be back on track now. This card is the card we made in class last week unfortunately it's not mine it's the one made by Betty. Mine was in the bag that was stolen along with all my tools, CD's and sat nav from my car on Monday. So I popped round and took a photo of our first Christmas card of the year.

The papers were a download from Internet and the card fold was a Venetian fold from Joanna Sheen's website. The bears were from a forever friends set I got last year I loved this set so am really miffed that it's gone. the images were coloured in with promarkers.

Thursday, 31 May 2012

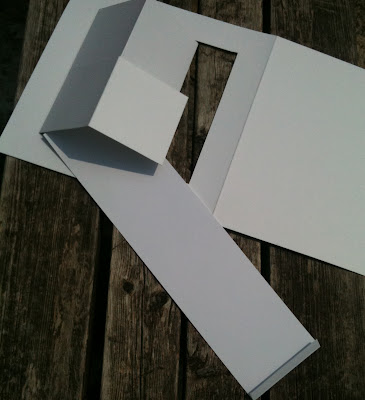
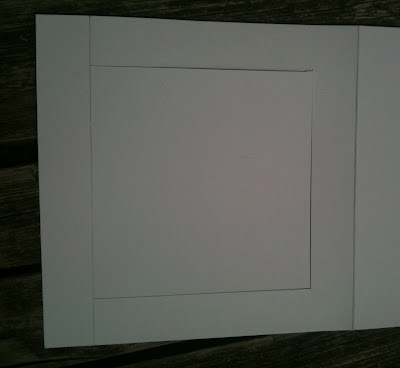
Take an 8x8 card and fold on the score line. Using your Docrafts clear ruler cut a line 2.5cm around 3 sides of the card. Do noy cut along the left hand edge.


Take an 8x8 card and fold on the score line. Using you
Docraft clear ruler cut a line at 2.5cm around 3 sides of the card. Do not cut
along the left hand edge.
Take an 8x8 card and fold on the score line. Using you
Docraft clear ruler cut a line at 2.5cm around 3 sides of the card. Do not cut
along the left hand edge.
Take an 8x8 card and fold on the score line. Using you Docraft clear ruler cut a line at 2.5cm around 3 sides of the card. Do not cut along the left hand edge.
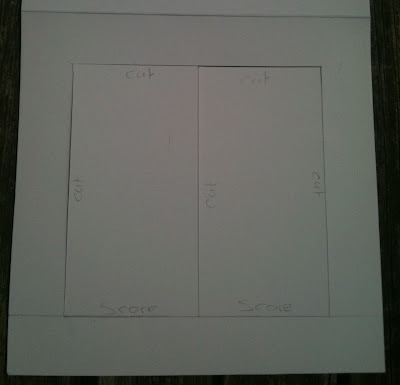
Divide the cut panel in half and cut to the score line. Fold back on the score line.

Divide the cut panel in half and cut to the score line. Fold
back on the score line.
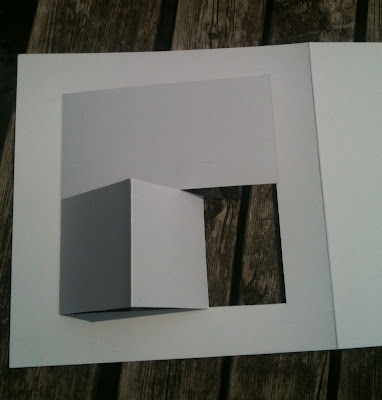
Fold the flaps in half to create a mountain fold.Cut 2 strips of card the width of the folded panels. score 1cm at one end. stick these to the narrow cut edge of the flap.

Cut 2 strips of card the width of the folded panels. Score
1cm at one end. Stick these to the narrow cut edge of the flap.
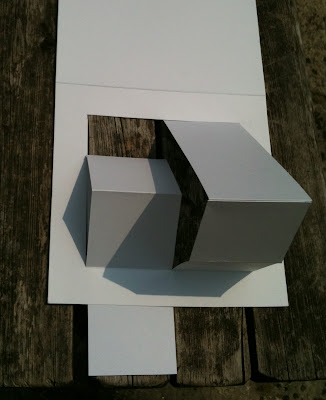
The strips of card need to come under the edge of the card.
The
strips of card need to come under the edge of the card.
Cut a frame from card.
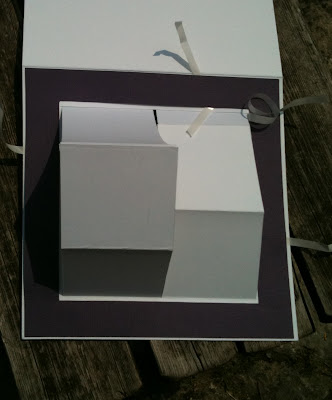
Stick the frame to the card front. I like to see a border of the card base. So I trim the square.
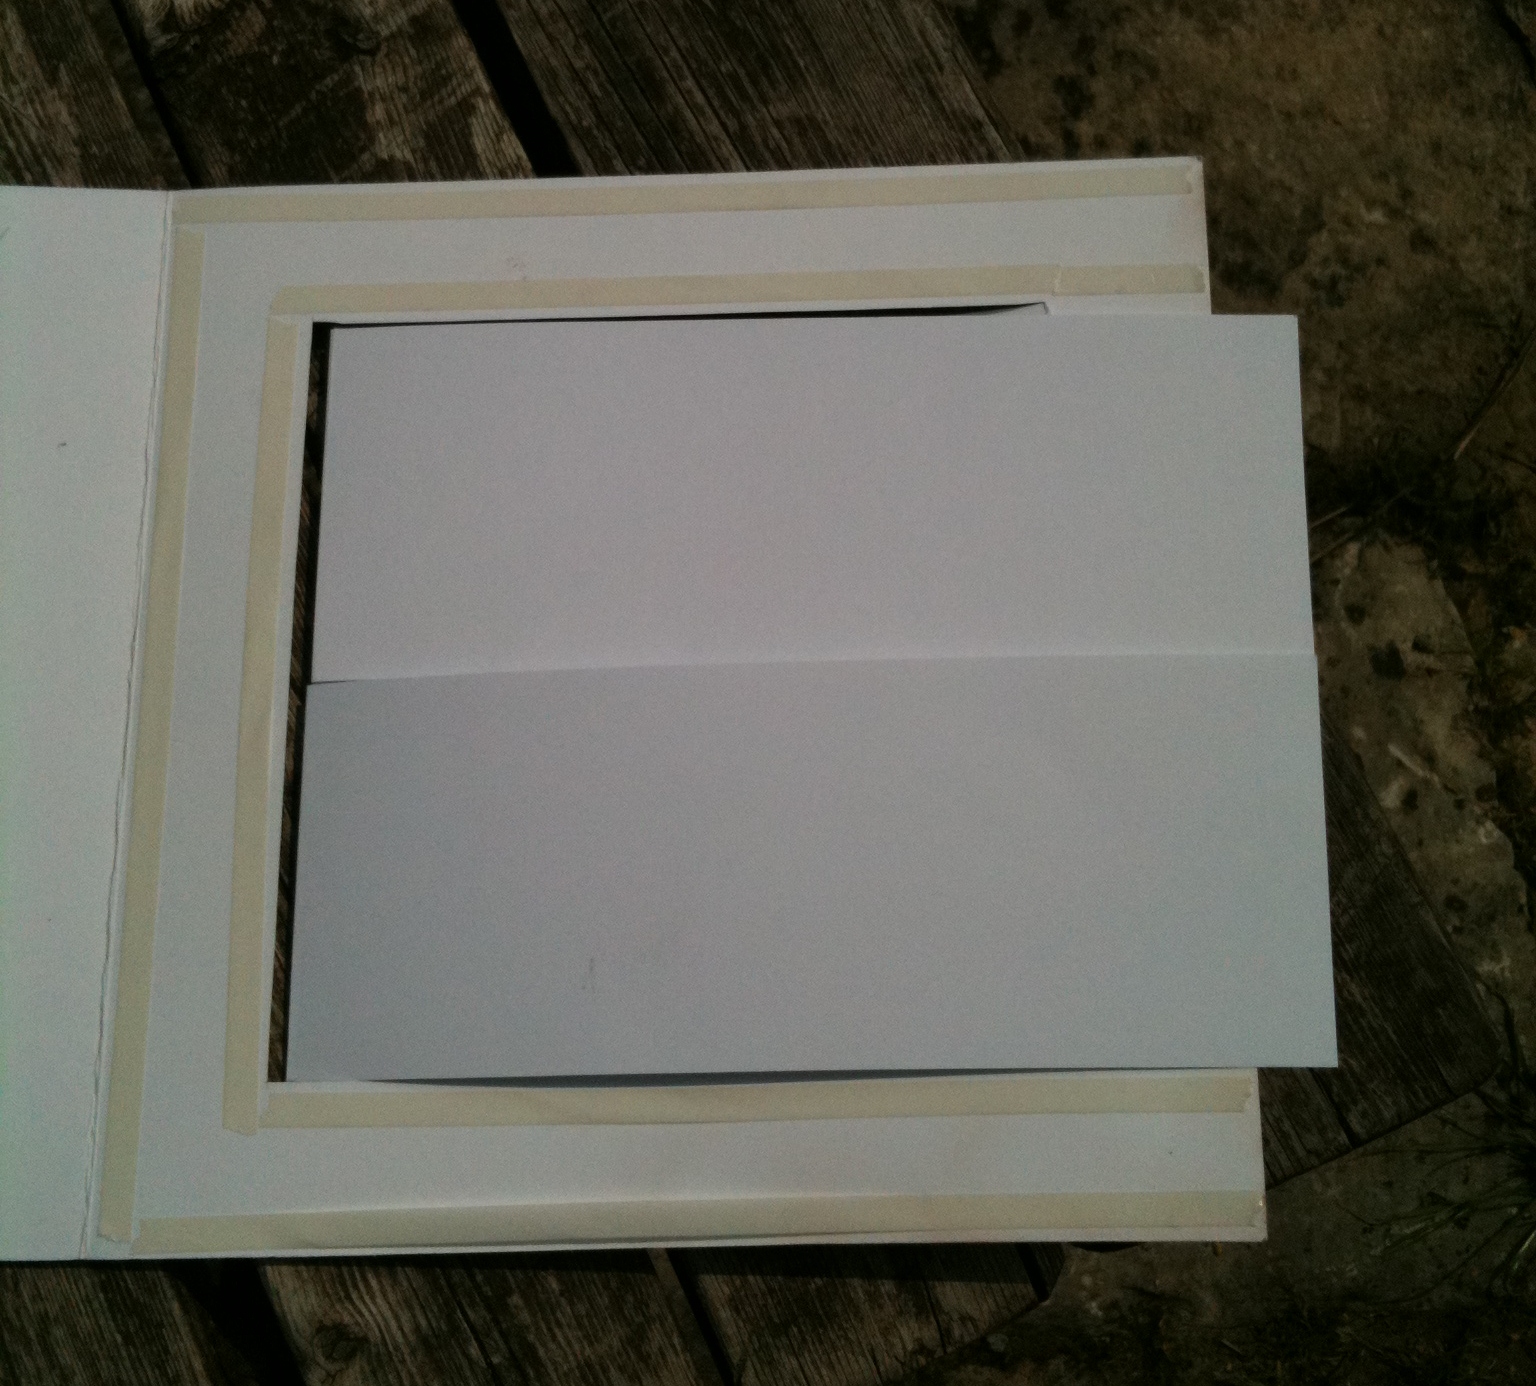
Stick the back of the card to the front. Remember that the strips of card need to be free running so don't put tape in this section.
Stick
the back of the card to the front. Remember that the strips of card need to be
free running so don’t put tape in this section.
The card should look like this.
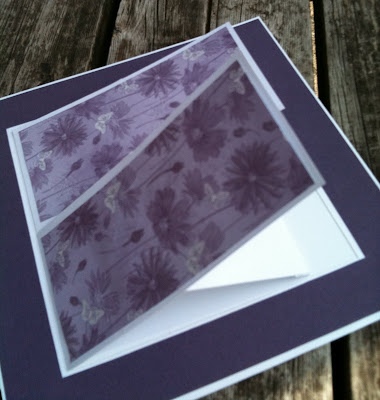
Cut 2 pieces of card the same size as the mountain sections. Stick to the lower section of the mountain piece.
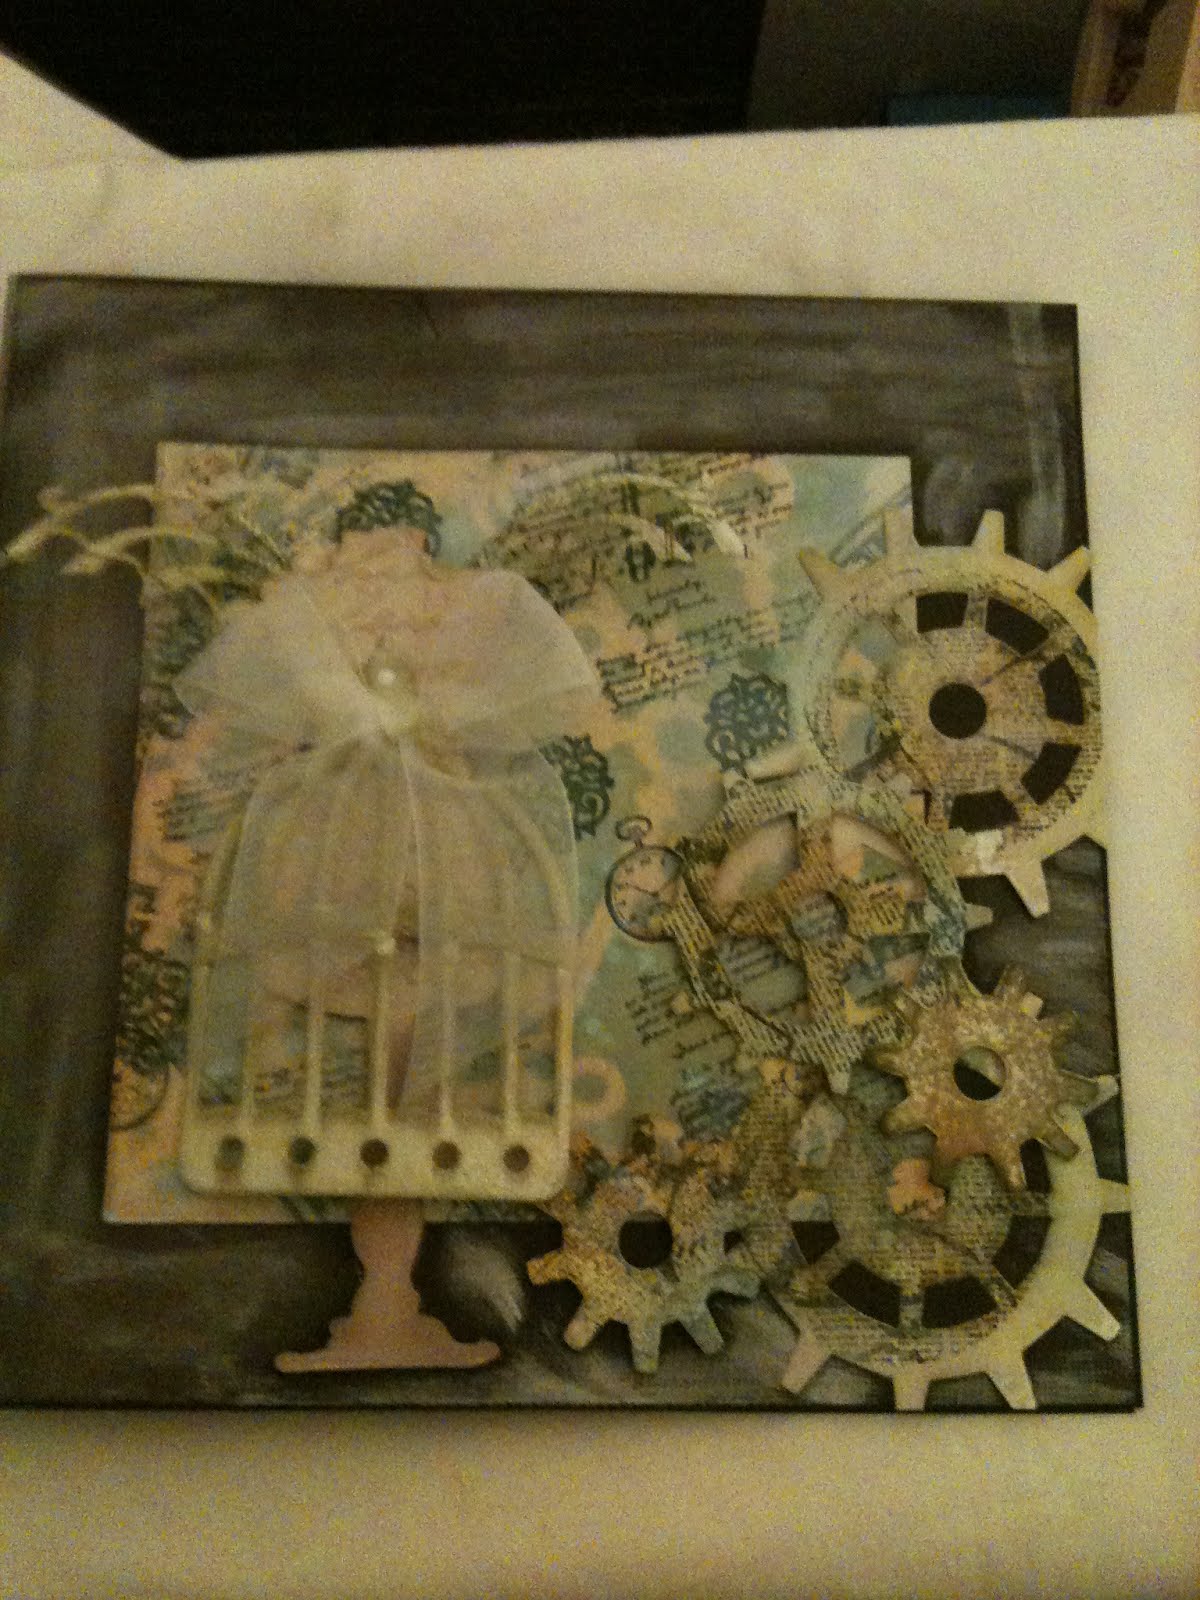
Decorate as required. Trim the strips punch a hole on the
bottom and tie ribbons.

Sunday, 6 May 2012

Scrapbooking galore

Portabello rd and kraft card worked great for this layout. This was the layout we did in our scrapbook crop in April.
Meet my grandaughter Paige and my son Oliver they will feature quite a lot in these pages as I hadn't started there scrapbook until this past month. shame on me she's now 18 moths old.
Lincoln linen paper work so well as I didn't want to be to use pinks or blues.
Both are forever Oliver will always be Paige's dad and that tattoo is there for ever. I should know!!!
This wasn't the actual first cuddle but it was the first one I was there for. Wellington papers and stamp set.
Boofle papers and ribbon made with 100% love.
Parkstone pink papers bloomers to celebrate the first night the little family went out together.Boofle buttons finished the bloomers off.
These next 2 pages were lifted from a couple of pages created by coventry-Ann on Docrafts site she does some really beautiful pages
And I just had to try and replicate them. Thank you Ann for the inspiration.
Parkstone pink scraps and stamping.
You would never guess it but I love this photo of maisie and I have scrapped it so many times All the products used in this are Docrafts parkstone pink and the stamping was a goody bag stamp of a cake!! bet you have it at home somewhere.
Oliver as a little man Boofle buttons, papers and embossing folder.

Tuesday, 27 March 2012

Scrapbooking

I wish to enter this page into the favorite challenge on http://www.sjpapercrafts.blogspot.co.uk/


So we have had our first scrapbook crop and the layout above was the one we did in our mini worksho. Simple but effective. Love this photo it was a colour 6x4 photo taken about 11 years ago. I needed a 5x7 black and white so a quick visit to Staples and I had what I needed. The picture is of Maisie and I.

This is a variation of the first layout and is Paige's first photo shoot.
If you are visitor of my demo-di.blogspot.com blog you will know one of my favorite things are bluebells.
When we had our crop Maisie decided she would have a go at scrapbooking so she followed one of my layouts and created this page. the only thing I did for her was put in the words and journalling.
Buster the dog playing with daddy in the bluebell wood.

Sunday, 11 March 2012

Distressed card

This was such fun. My daughters friend is a goth so flowers were a no no. So out came the ink, masks and dies.

Lots of inking spraying and over stamping. Oh yes and a bit of embossing.


A mix of Tim Holtz and Papermania.